| Wangan Midnight Expressway · Forum Guidelines | Donation · Gallery · Soundtracks · Help · Search · Members · Calendar |
| Welcome Guest ( Log In | Register ) | Resend Validation Email |
| 24 Pages |
 |
Thread Rating: 2 votes, 5.00 average. Rate:
| JZX100 |
Posted: Dec 22 2010, 10:36 PM
|
||
|
I Miss Aristo  Group: Advanced Members Posts: 1,247 Member No.: 1,738 Joined: Dec 22nd 2007 Location: Stuck under the Space needle. |
Please tell me you're being sarcastic. @Oddmanout: Well, it's feasible to do the KA24 swap, but why?  |
||
|
|

| Oddmanout84 |
Posted: Dec 22 2010, 11:29 PM
|
||
|
Resident Alcoholic Group: Advanced Members Posts: 1,033 Member No.: 3,693 Joined: Sep 25th 2008 Location: My garage, waiting for overnight part from JP |
It was an idea at one point. There's a guy on HybridZ who built a JUNKYARD KA24DET S30 that smokes most cars on the strip at around 400HP. The guy spent less than $2000 on his build. Four hundred on stock internals! Crazy! No way I'd do that. But with a set of H-beam rods, forged pistons and some porting, imagine what I could do (reliably). Reliable 400hp has been the goal of my Z, so this would fulfill it easily, and with a DOHC setup that I've wanted. And less weight. But putting a four cylinder in the bay has always seemed kinda... meh... to me. So its sort of a pet project. I have a KA sitting in my garage that I got for free, so I've been playing with it. I'd rather an RB25, but that depends on whether the ship sails. For now I'm rebuilding the L28ET |
||
|
|
| +-!mma_N00B-+ |
Posted: Dec 23 2010, 04:12 PM
|
||
|
時よ止まれ! Group: Core Members Posts: 5,287 Member No.: 7,398 Joined: Oct 15th 2010 Location: Cebu, Philippines |
No, I wasn't  |
||
|
|
| Oddmanout84 |
Posted: Jan 30 2011, 08:01 PM
|
|
Resident Alcoholic Group: Advanced Members Posts: 1,033 Member No.: 3,693 Joined: Sep 25th 2008 Location: My garage, waiting for overnight part from JP |
 |
|
|
| Oddmanout84 |
Posted: Mar 15 2011, 05:11 PM
|
|
Resident Alcoholic Group: Advanced Members Posts: 1,033 Member No.: 3,693 Joined: Sep 25th 2008 Location: My garage, waiting for overnight part from JP |
Prepare for massive progress dump.
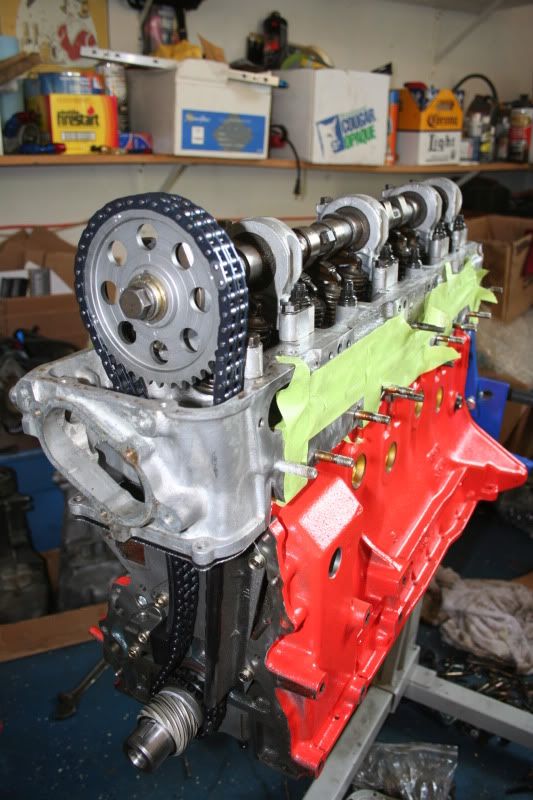
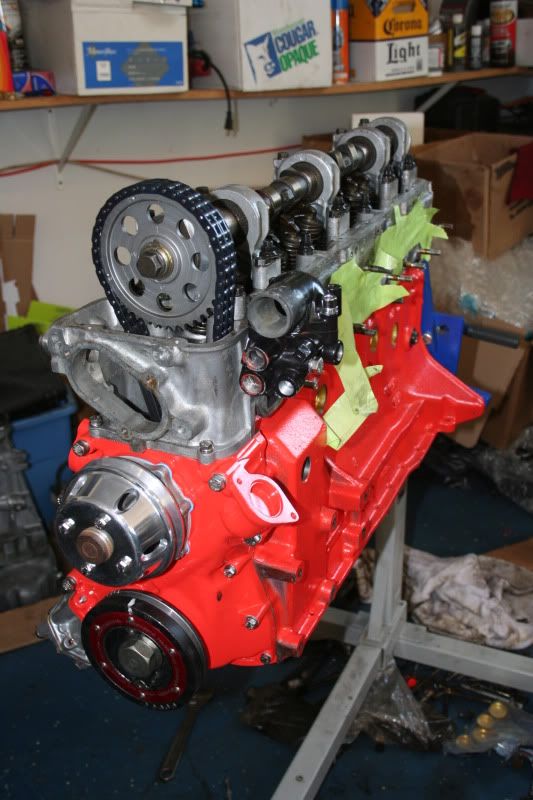
I've been saving it until I got some more exciting work done, its not like I've been slacking off with updates or anything. That's my excuse and I'm sticking to it. I didn't get much done today, but I did make progress. I've cleaned this block about 5 times now to make sure there's no contaminants or bits of metal and cloth. 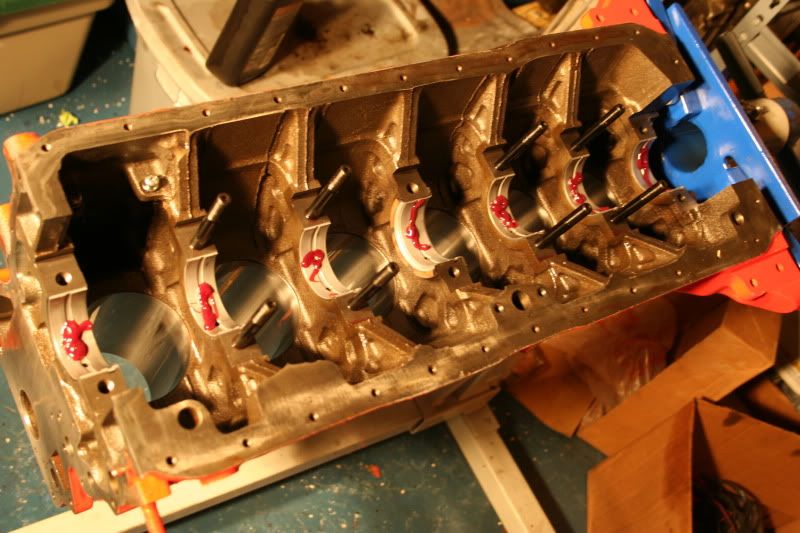 Clevite 77 main bearings are in. Plastigauged all the mains and everything is within specs. I hate removing and installing the main caps over and over again. The Datsun rebuild book I've been following says to wet everything with oil, but I figured I'd do it one step better. The Clevite engine assembly lube I'm using is the color and consistency of strawberry jam. Very thick, very sticky and gooey. It doesn't taste like strawberries though. 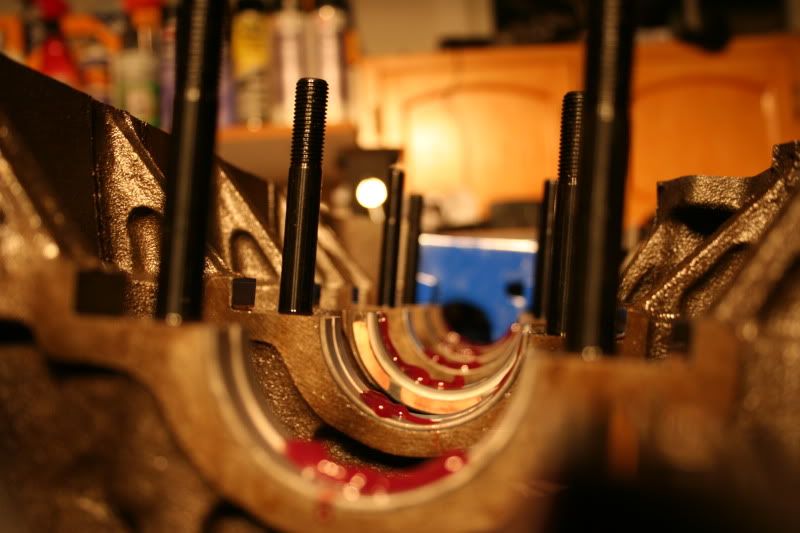 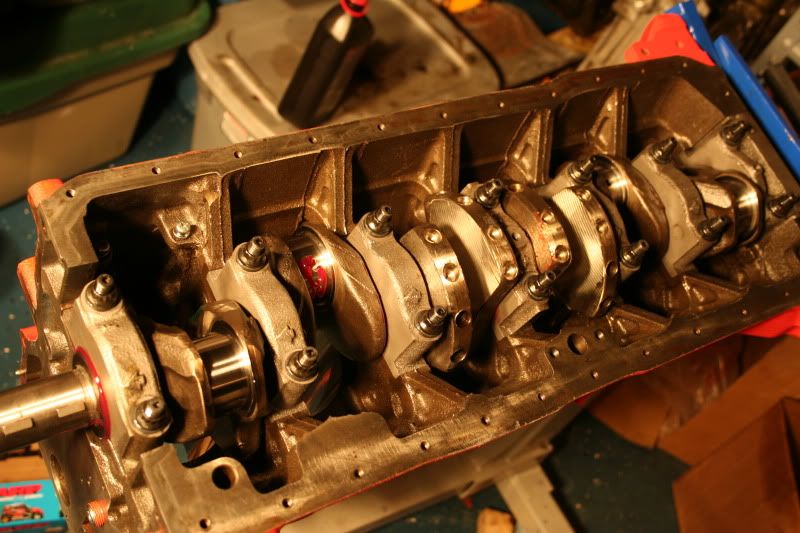  Dropping the crank in was nearly a panic attack scenario. Rear main seal was smeared with molybdenum and put on the crank first. After laying the bead of RTV in the groves of the rear main, I had to rush to get the crank into the block and torque it down... along with several other things in between. Its also really hard to do seeing as I can barely squeeze fingers between the back of the block and engine stand. Though that assembly lube is great, its so thick that I could barely tell if the crank was moving back and forth when I aligned the thrust faces of the bearings. After everything was cinched down to final torque the crank spins freely... as freely as one can imagine something spinning in a jar of fruit preserves. Tomorrow if all goes well I'll be sizing the piston rings and installing the rest of the internal rotating assembly. I think this oil sump has increased capacity over stock... 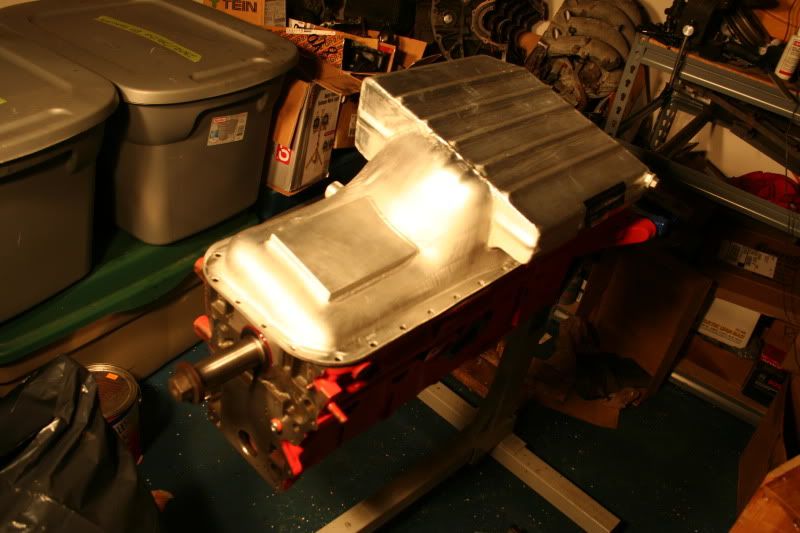 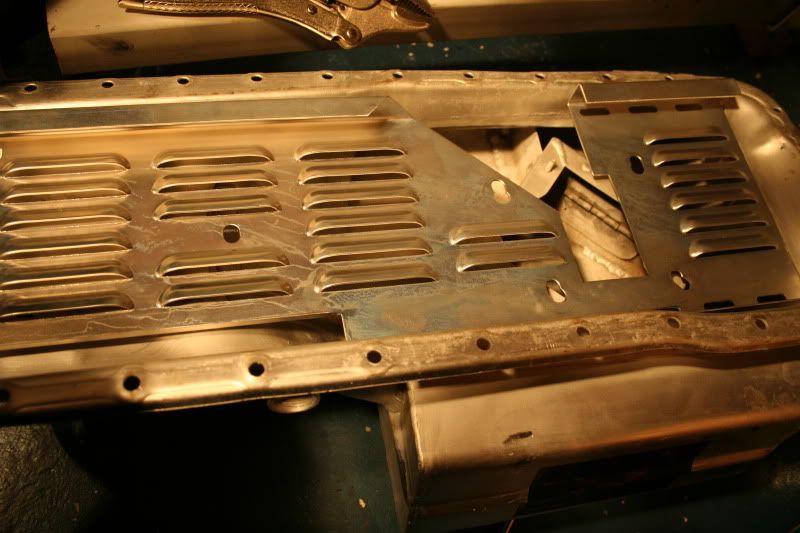 Got my windage tray in from Aviaid today too, which was a pleasant surprise. I was also really surprised at the cost, very inexpensive! Two things though, as Jon from Aviaid warned the pans they made over the years went through some minor changes. In my case, the windage tray they currently make is larger and different from the one that would originally fit in my pan. I'll have to cut it to size a bit, and drill different mounting holes. The other thing is that because of my ARP main studs, the pan won't sit flat! The rear two studs contact the rear of the pan, so I'll have to clearance them. I'm just going to break out the propane torch and knock out a couple bumps in the rear of the pan. I still haven't had the time to install the pistons. When I gapped the rings, I freaked out because they were all at the upper limit at .020" (about .006" per inch of bore). It seems a bit excessive to me, but I think I'm going to run them anyway. I do have a turbocharged engine after all, which means with the higher temps it should be better to have gaps on the large side rather than too small. Finished gapping all of my rings today. Had to do a bunch of swapping rings between the 6 sets in order to end up with consistent gaps. The Datsun books say that the second compression ring can/should have a smaller gap because it doesn't see as much heat. However, I made them all .002" larger than the top compression rings in order to reduce the possibility of ring flutter. Once again, I'm trying to apply some more modern principals to an old engine. Good idea? We'll find out I suppose. Then it was time for me to get my daily dose of anger and fury just as I was getting ready to put the rings on the pistons. The ARP rod bolts are PRESS FIT. The old ARP bolts are still in the rods. You're supposed to be able to reuse them, but I'm not for a couple reasons. One is that I'm rebuilding an engine that was previously run at high RPM in a track car, and showed some of the effects of such abuse when I cracked it open. The machinist had to hone out a few of the rods because they were egg shaped. The other reason I'm not reusing them is because when Clay and I swapped it into the car almost two years ago, we did a quick torque check. I didn't know they were ARP's so I torqued them to DATSUN specs. Way over ARP specs which are torqued with special lubricant. So they're probably stretched to yield point. Looks like another trip to the machine shop to press out the old bolts and get the new ones pressed in.... Several days later... The machine shop startled me yesterday when they called and said the rods were ready ahead of schedule. So I picked them up promptly. Piston rings were inspected one last time and the secondary compression rings (which I increased the gap on) were lightly sanded smooth with 400 grit on the cut edges to remove burs. Then I grabbed my handy ARP ring compressor and slapped them in, nothing to it. The new ARP bolts were torqued in something more along the lines of 6 steps (as opposed to 4 per instructions) because the red snot assembly lube is so THICK that it left a gap between each rod and cap. Very carefully tightened them down lightly until the excess squeezed out. 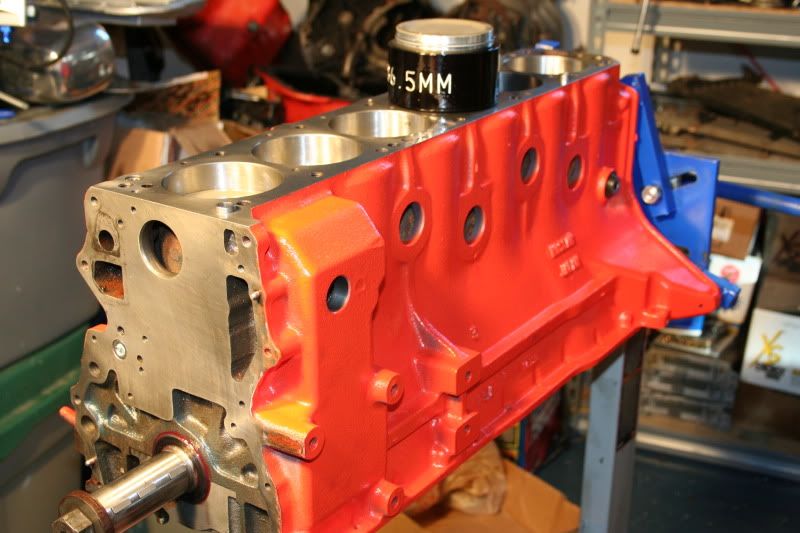 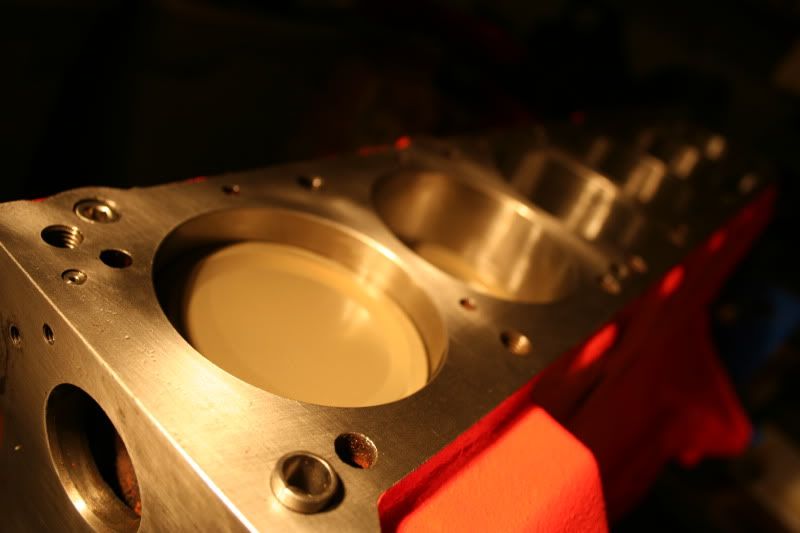 Bonus points if you spot my block modifications. So now of course I'm on to my next hangup, the oil pan. Its meant for a 240z, so I need to source an L24 oil pickup (which is slightly longer than a 280z). I also still need to bump out clearance for the two rear main studs. At least after I clearance the pan I'll be able to mock it up with the head and finish making my turbo oil drain. Till then, I'm pretty dead in the water. At least in terms of building the engine. Here, kitty kitty... 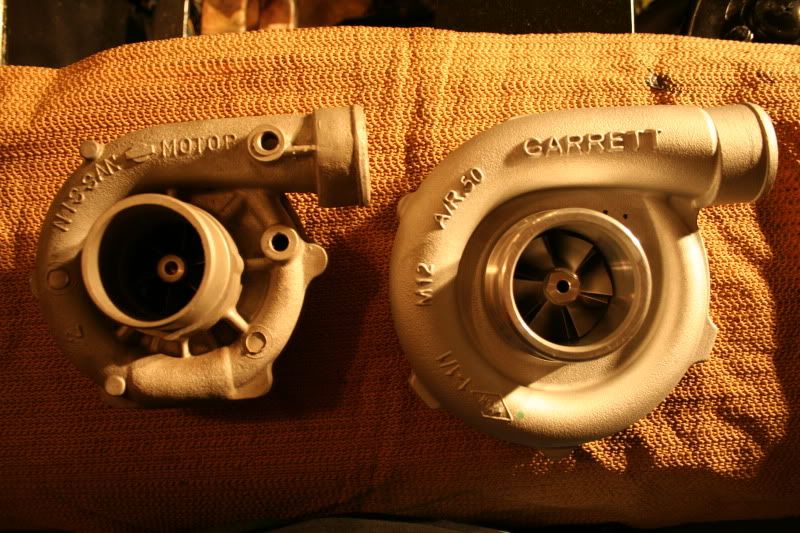 Since I'm cheap and can't find the turbocharger I want (new for a low price, or used and needing rebuild), I've been collecting parts over time for my T3/TO4E hybrid turbocharger. This compressor housing and wheel are only .50ar and 50 trim respectively, but they're positively massive when viewed next to the stock Nissan compressor. I have a block off flange and external wastegate in the plans, but I'm probably not going to run that setup until after I install the larger injectors I've been sitting on for over a year. I suppose I might be able to hook up the wastegate directly so it will open at 7psi as a precaution, but even that might be pushing the limits of safety. And that's about it up until now. Also got these babies from a land far away, not California where they charge over twice the price for less keys. 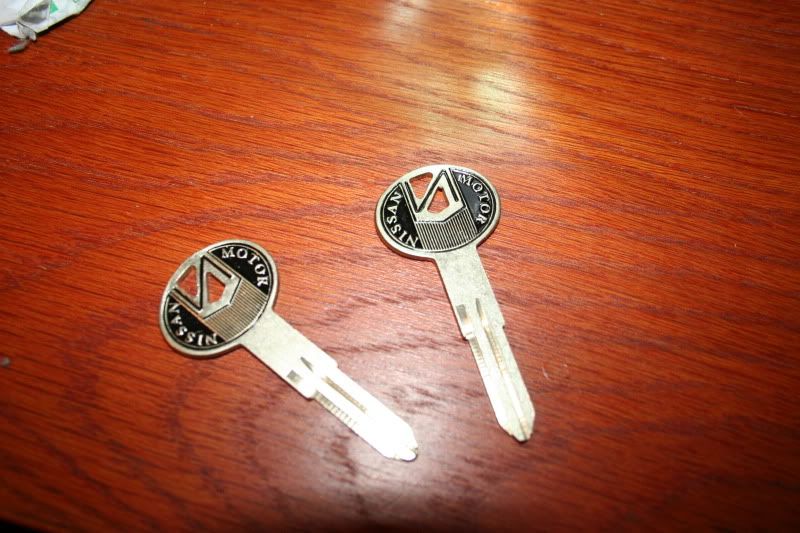 |
|
|
| TexasDemonZ |
Posted: Mar 16 2011, 01:00 AM
|
|
Request Title - PM Mods Group: Members Posts: 421 Member No.: 2,359 Joined: Mar 6th 2008 Location: Austin, TX |
Coming along nicely. Your build always makes me smile for some reason.
Btw, was cruising the Aero section of HBZ and saw that you posted a cardboard template for a ducting system. Oddly enough, I'm actually looking into doing something with that gaping maw that is the front end as well. In my case however, looking to migrate the headlights into the grille area. I have to find the right slim and simplistic headlight to stick in there first. But if you do anything with the ducting I'd at least be interested in seeing it. Keep up the good work!  |
|
|
| Oddmanout84 |
Posted: Mar 16 2011, 07:21 AM
|
||
|
Resident Alcoholic Group: Advanced Members Posts: 1,033 Member No.: 3,693 Joined: Sep 25th 2008 Location: My garage, waiting for overnight part from JP |
Heh heh... I have been posting different bits of info around the internets on what's going on with this build, looks like you found some of it.  yep, the aero idea is still in progress, I just put it on hold yesterday while I did everything possible to the motor until I ran out of the parts required. Also in the works is a block off/belly pan that will cover the entire area under the airdam to the middle of the engine bay (similar to what hoke did). but for now, I only have enough metal for the ducting prototype. |
||
|
|
| TexasDemonZ |
Posted: Mar 16 2011, 05:16 PM
|
||
|
Request Title - PM Mods Group: Members Posts: 421 Member No.: 2,359 Joined: Mar 6th 2008 Location: Austin, TX |
lol, I do have eyes on a few forums |
||
|
|
| Oddmanout84 |
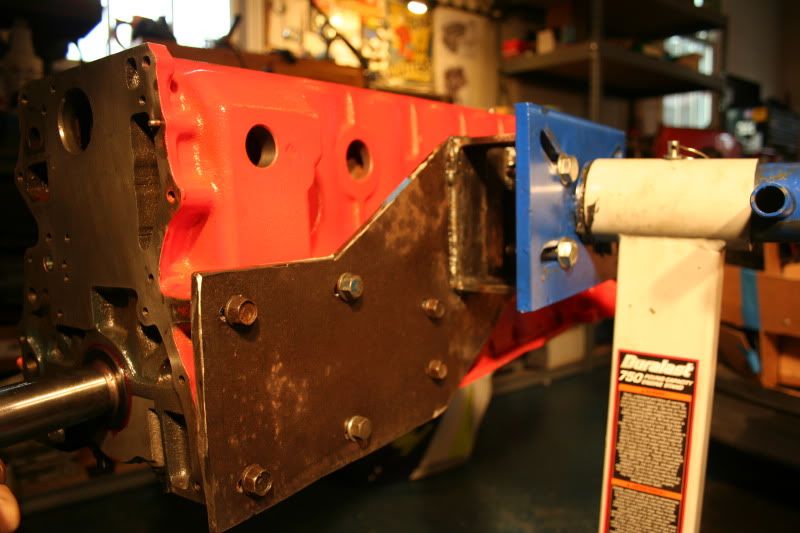
Posted: Mar 20 2011, 04:39 PM
|
|
Resident Alcoholic Group: Advanced Members Posts: 1,033 Member No.: 3,693 Joined: Sep 25th 2008 Location: My garage, waiting for overnight part from JP |
Made myself a side mount for the engine stand yesterday out of scrap metal. feels good to get back into welding.
 Today I'm tired as f**k. Just finished the majority of cutting and welding my fenders for the ZG flares (FINALLY). |
|
|
| GinjaNinja |
Posted: Mar 26 2011, 05:23 AM
|
|
Speed King Group: Members Posts: 81 Member No.: 2,562 Joined: Apr 6th 2008 Location: BrisVegas, Australia |
Sweet, keep up with the updates, looks to be an interesting build
|
|
|
| Oddmanout84 |
Posted: Mar 28 2011, 01:57 PM
|
|
Resident Alcoholic Group: Advanced Members Posts: 1,033 Member No.: 3,693 Joined: Sep 25th 2008 Location: My garage, waiting for overnight part from JP |
 Some of you may remember this woeful 70's dealer modification on my car. Some of you may have the same. Hint: its on my roof. Well... 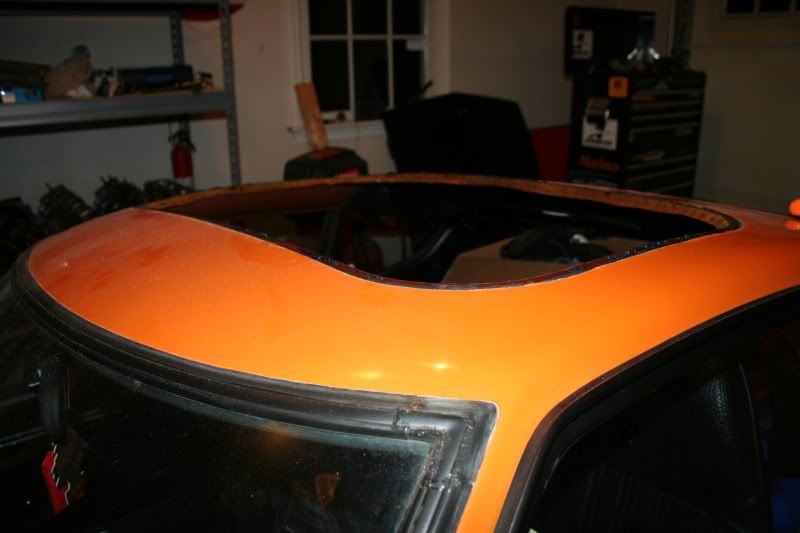 Pop. 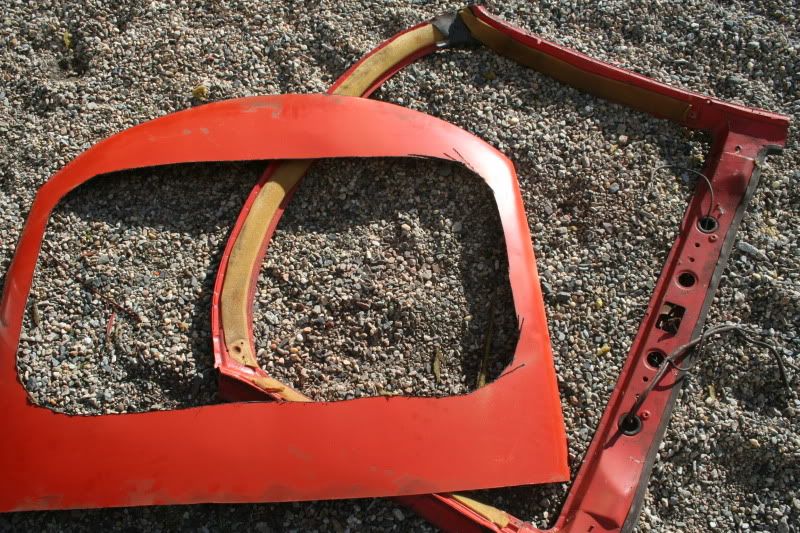 Cut. 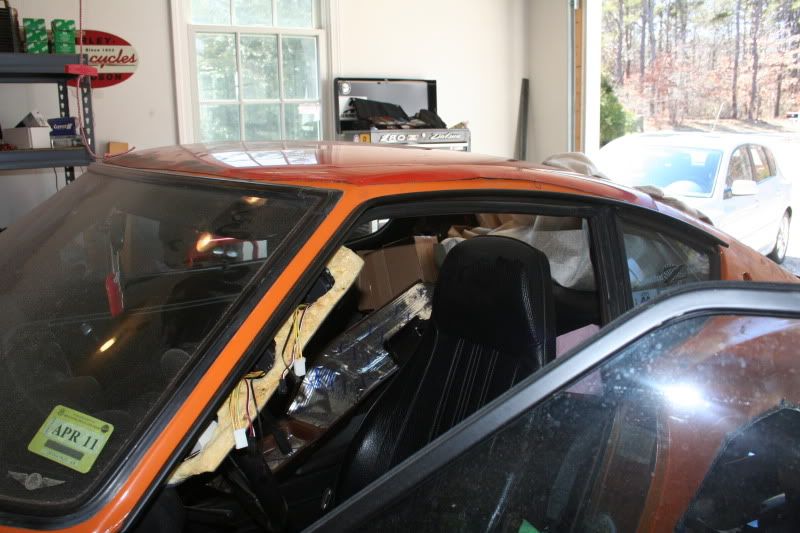 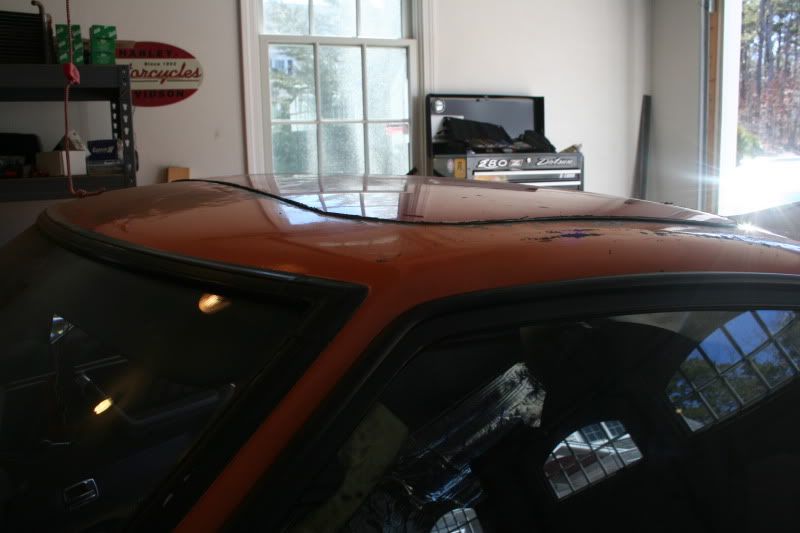 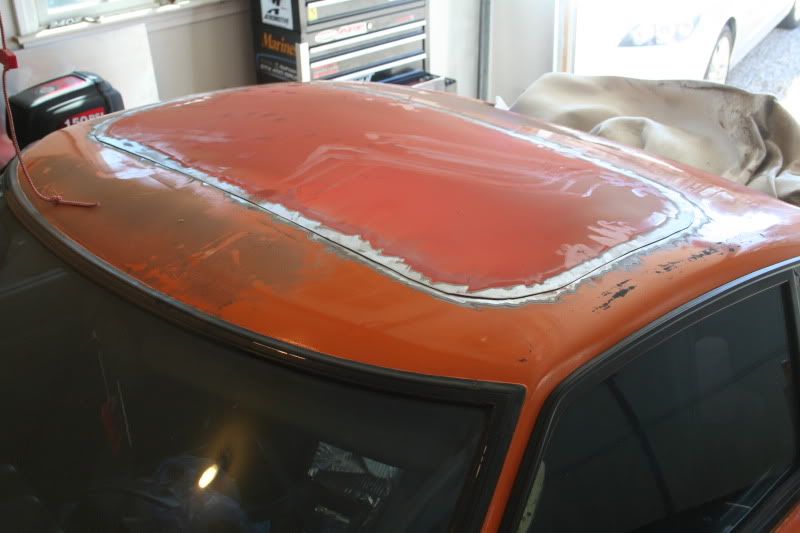 Fit. 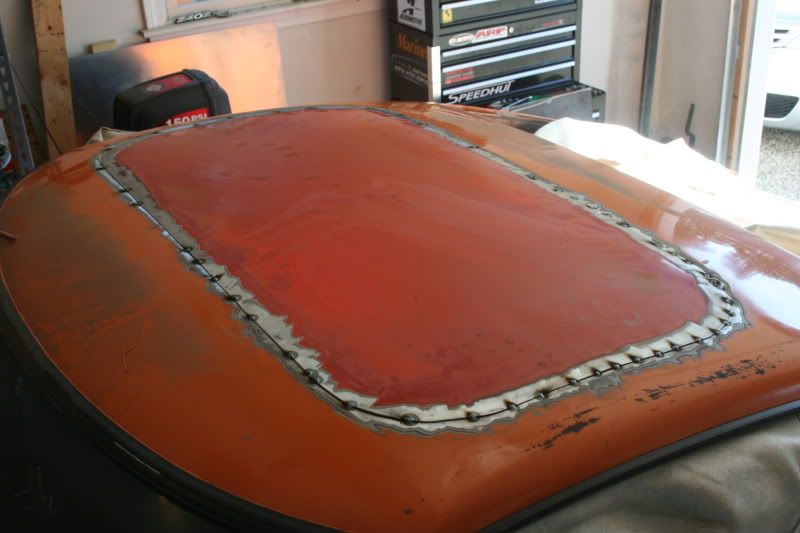 Paste. 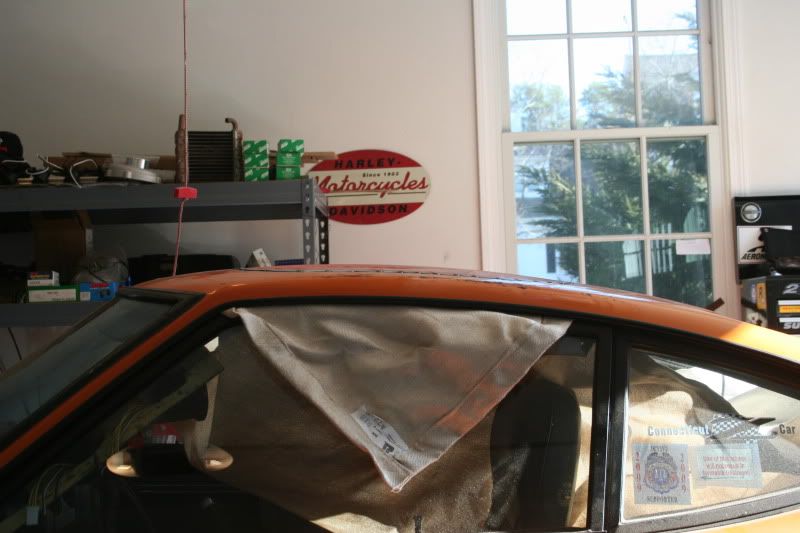 Besides the bumps from the tack welds, the panel is perfectly flush with the rest of the roofline. Those will be ground down and smoothed once I make some more. Thank you Hobart, thank you Eastwood flanging tool, and most of all thank you donor '73. [ Post merged on Mar 28 2011, 01:59 PM ] Also, MAYHEM!!! 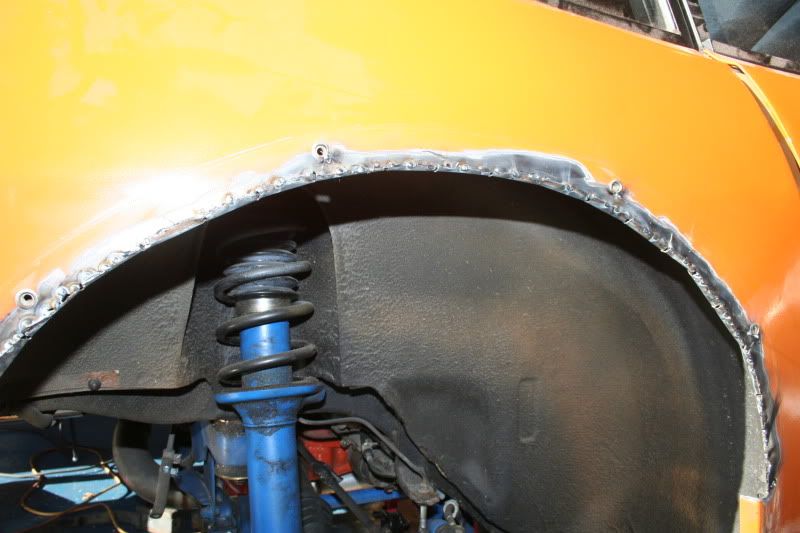 Finally got around to cutting and rewelding my fenders to better accommodate my wide tires. |
|
|
| +-!mma_N00B-+ |
Posted: Apr 6 2011, 06:30 AM
|
|
時よ止まれ! Group: Core Members Posts: 5,287 Member No.: 7,398 Joined: Oct 15th 2010 Location: Cebu, Philippines |
Lol, just saw your updates after a while. I also agree with you that the moonroof destroys the car's look at certain angles.
And now that you've made more space for the tires, is it running more smoothly now? |
|
|
| Oddmanout84 |
Posted: Apr 6 2011, 09:37 AM
|
||
|
Resident Alcoholic Group: Advanced Members Posts: 1,033 Member No.: 3,693 Joined: Sep 25th 2008 Location: My garage, waiting for overnight part from JP |
Lol, how would I know... it still doesn't have a drivetrain in it! |
||
|
|
| TexasDemonZ |
Posted: Apr 6 2011, 09:48 PM
|
||
|
Request Title - PM Mods Group: Members Posts: 421 Member No.: 2,359 Joined: Mar 6th 2008 Location: Austin, TX |
Hills and a tow rope are a perfectly acceptable replacement for a drivetrain in the mean time. |
||
|
|
| Oddmanout84 |
Posted: Apr 7 2011, 01:50 PM
|
||
|
Resident Alcoholic Group: Advanced Members Posts: 1,033 Member No.: 3,693 Joined: Sep 25th 2008 Location: My garage, waiting for overnight part from JP |
I live at sea level with hardly any changes in altitude for 20 miles... |
||
|
|
| Oddmanout84 |
Posted: Apr 13 2011, 09:17 AM
|
|
Resident Alcoholic Group: Advanced Members Posts: 1,033 Member No.: 3,693 Joined: Sep 25th 2008 Location: My garage, waiting for overnight part from JP |
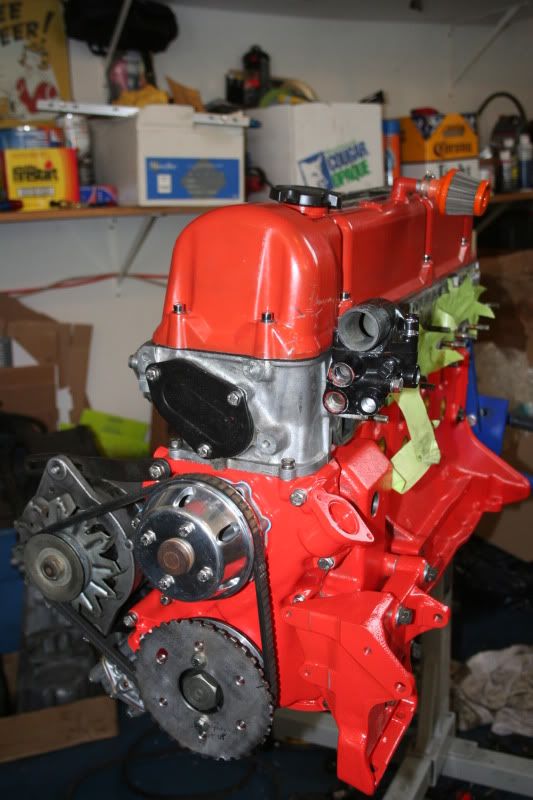
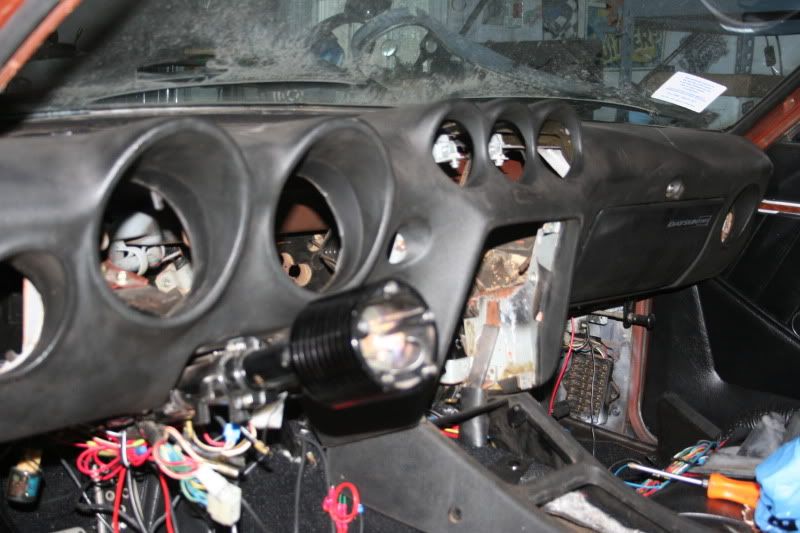 Trial fitment of the old style dash. Its going to take a bit more work than I thought to get the essential brackets and mounts to line up. As an additional headache, it also uses a slightly different defroster grille. 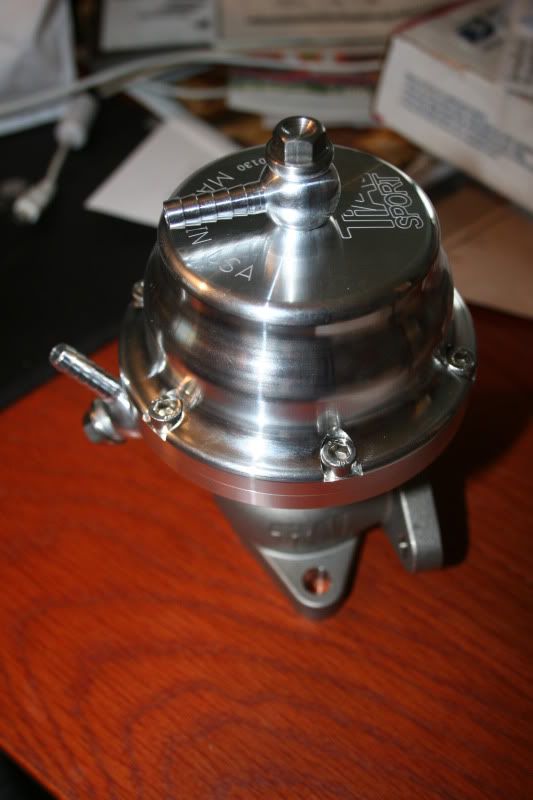 The new wastegate. 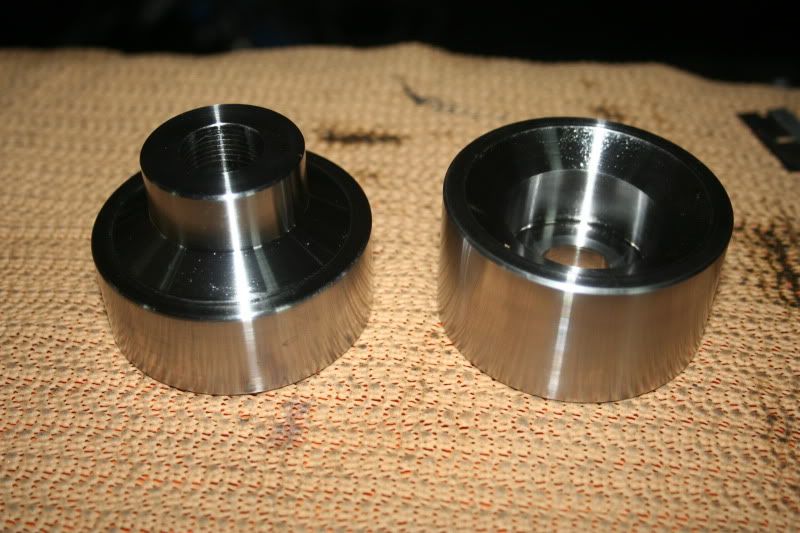 You get a cookie if you know what this is, and what I'm using it for. |
|
|
| MaikazeFD3S |
Posted: Apr 13 2011, 10:12 AM
|
|
WME King Tiger Group: Advanced Members Posts: 2,533 Member No.: 3,055 Joined: Jun 13th 2008 Location: Update Profile |
Awesome updates man, Im glad the project is still moving along just fine. I havent heard from you in a while, nice to see your doing well.
|
|
|
| Oddmanout84 |
Posted: Apr 14 2011, 02:21 PM
|
||
|
Resident Alcoholic Group: Advanced Members Posts: 1,033 Member No.: 3,693 Joined: Sep 25th 2008 Location: My garage, waiting for overnight part from JP |
It hasn't been THAT long since I updated...  |
||
|
|
| Blue-Sensei |
Posted: Apr 15 2011, 09:38 AM
|
|
I have no idea what I'm doing Group: Advanced Members Posts: 1,074 Member No.: 7,637 Joined: Jan 16th 2011 Location: Virginia |
Yes,...yes it has...This page is the first to open when firefox starts up..
|
|
|
| Oddmanout84 |
Posted: May 2 2011, 05:52 PM
|
|
Resident Alcoholic Group: Advanced Members Posts: 1,033 Member No.: 3,693 Joined: Sep 25th 2008 Location: My garage, waiting for overnight part from JP |
This is all just mockery... Nothing is really set, just checking clearances and making sure everything goes together like its supposed to.
   Welding up all the unneeded holes in the engine bay and prepping it for paint is turning out to be a total b*tch. |
|
|
| StraightAwayZ |
Posted: May 3 2011, 07:22 PM
|
|
Legendary Emperor Group: Members Posts: 296 Member No.: 1,547 Joined: Nov 28th 2007 Location: Update Profile |
Approved.
|
|
|
| TexasDemonZ |
Posted: May 5 2011, 12:09 AM
|
|
Request Title - PM Mods Group: Members Posts: 421 Member No.: 2,359 Joined: Mar 6th 2008 Location: Austin, TX |
Agreed, looks great
|
|
|
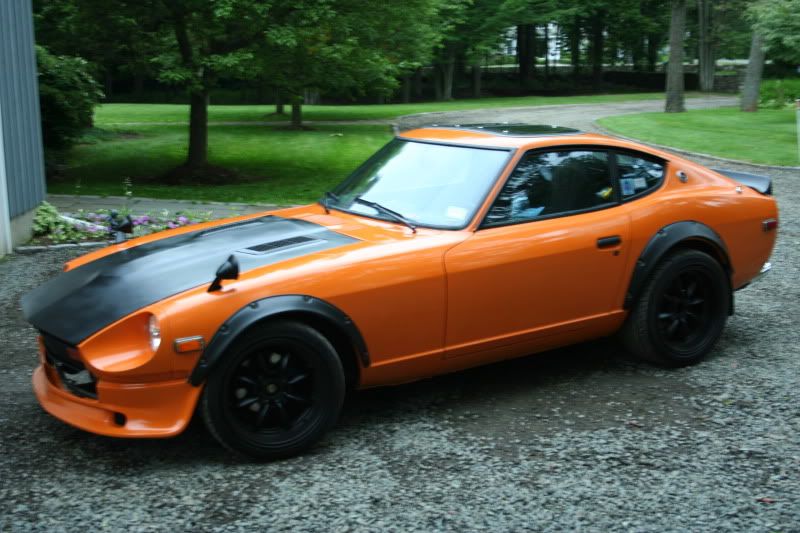
| Oddmanout84 |
Posted: May 28 2011, 10:01 AM
|
|
Resident Alcoholic Group: Advanced Members Posts: 1,033 Member No.: 3,693 Joined: Sep 25th 2008 Location: My garage, waiting for overnight part from JP |
Photos speak for themselves, mostly.
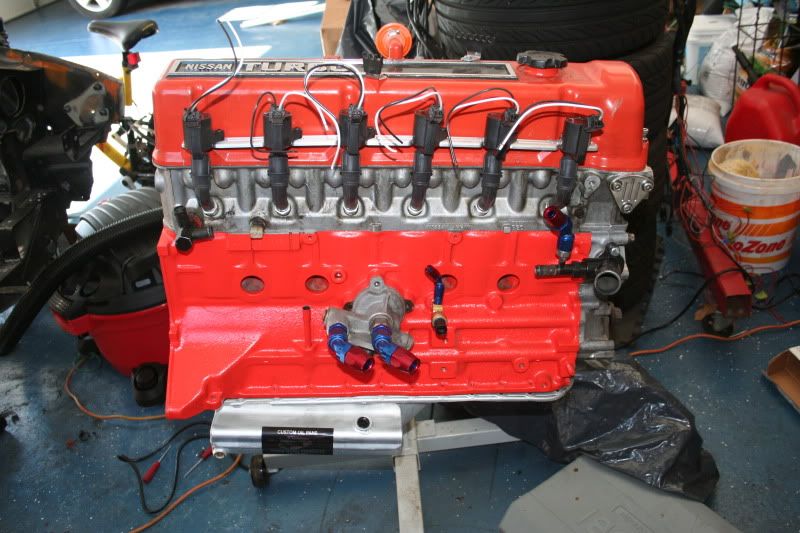
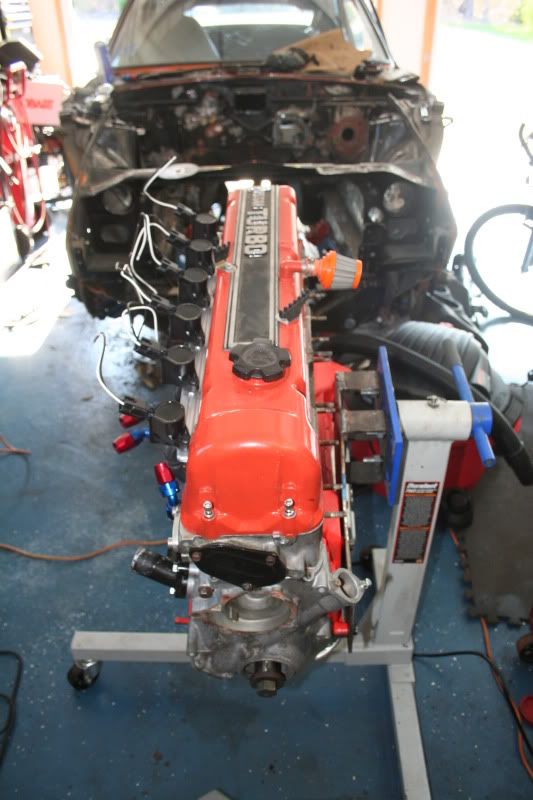
   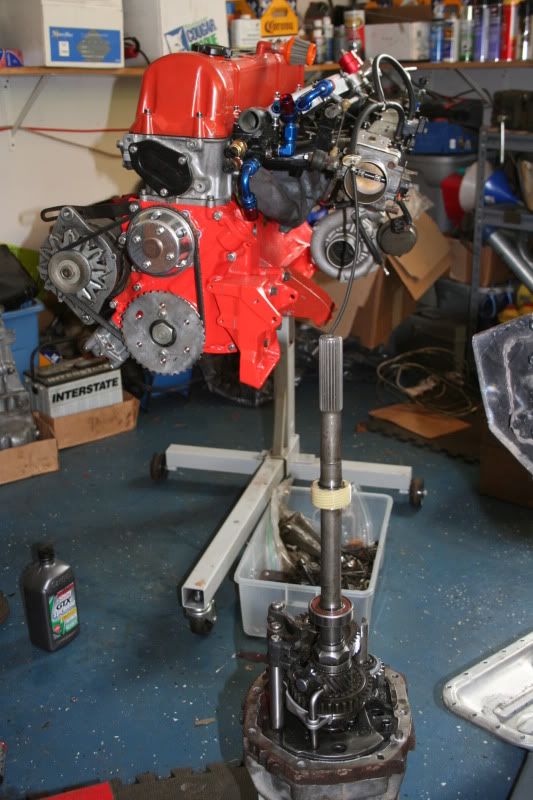 I'll admit the last photo shows a lot of ancillary components like the manifolds merely mocked up on the block, not fully installed, for clearancing the plumbing. The tiny stock turbo probably won't be put on there, but because my other T3 exhaust housing has two broken studs WITH broken extractors in it I'm screwed unless I either cannibalize the stock Nissan turbo or find another T3 stage 1 housing (nearly impossible it seems). I can't run the OEM turbo anymore because it has a dry housing, and the motor is now set up for a water cooled center section. Sure, I could just cap off the lines temporarily or join them together to complete the circuit, but that would just be silly. Also making an appearance in the photo is my modified transmission (FINALLY done). There's a red puddle under the engine that you might be able to see. I'm still in the process of modifying the oil pan and the pickup to fit the engine, which has been a total pain. The recent heat wave has decreased the viscosity of the assembly fluid so it's been dripping down to the floor, with no oil pan to catch it. The engine is nearly ready to drop in. The car itself it seems, is not. 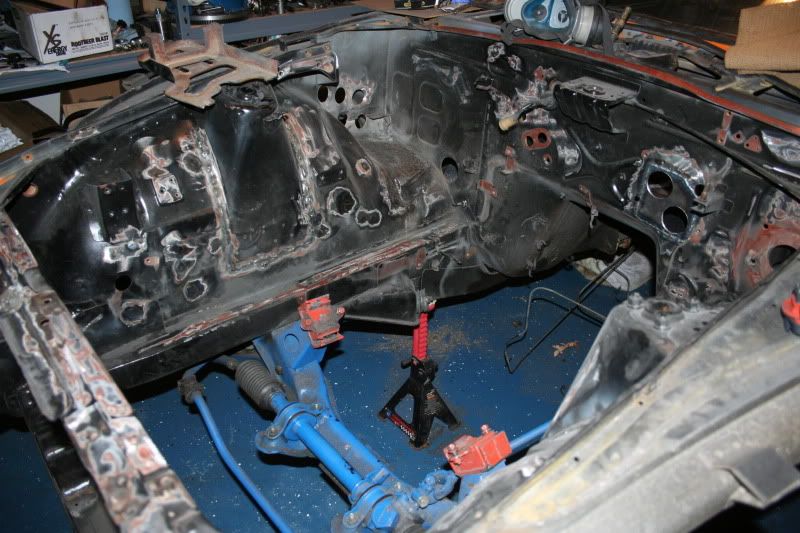 This post has been edited by Oddmanout84 on May 28 2011, 10:02 AM |
|
|
| PanzerAce |
Posted: May 28 2011, 02:32 PM
|
|
WME King Tiger Group: Advanced Members Posts: 835 Member No.: 2,725 Joined: May 1st 2008 Location: Merced, CA |
Looking good man
 |
|
|
| Blakout |
Posted: May 28 2011, 02:33 PM
|
|
Local TF2 Addict Group: Members Posts: 425 Member No.: 7,397 Joined: Oct 15th 2010 Location: Vancouver |
dat Z is b055.
This post has been edited by Blakout on May 28 2011, 02:34 PM |
|
|
| 24 Pages |
|
Powered by Invision Power Board 1.3.1 Final © 2003 IPS, Inc.